The problem with physical tabletop games compared to a video game is the physical components. This will take space to store and cost a lot of money from the manufacturer to whoever buys the game. Because of that, the price can go very high without generating that much profit for the developer or designers.
This got even worse during pandemic. Not only people couldn’t get together and play, the production process and shipping anything got delayed heavily. The price of games went up and led to bankruptcy for some small publishers.
On the other hand, there is a genre within tabletop games called Print and Play (PnP) games. Even until now, some people just love creating some games and they share the file of their game’s components. This way, more people can download it, print them and then play the games without buying a produced retail copy.
Some designers may charge some prices for the file. While some others are sharing for free or ask for any amount of compensation from the players.
Then, during pandemic, one publisher, Postmark Games came out with a new model. They ask for 1 time payment to buy the file for their game but they make a promise that buyers will get access to any future contents for that game.
Voyages, their first game, was a success. That idea inspired a lot of other game designers to use the same approach. As a PnP, players must do a bit more effort printing the components. However, they also encouraged the idea of playing the game digitally.
So, what is this Voyages game? How do we play it? Is it too much effort to print the game ourselves?
Those are probably just a few questions that came to mind after hearing about the game. Well, in this article, I’m going to share my Voyages game review based on my experience on playing the game.
Hope this helps. Is Voyages the best Print-and-Play game out there?

Click or tab on any sections from the table of contents to jump right to that part. Use the red arrow button on the bottom right corner of the screen to head back to the top
Table of Contents
Overview
Game’s Title: Voyages
Genre: Print and Play, Roll and Write, Dice Manipulation, Competitive, Exploration Theme, Nautical Theme, Official Solo Variant, Optional Campaign Mode
Designers: Matthew Dunstan, Rorry Muldoon
Artist: Rorry Muldoon
Publisher: Postmark Games
Number of Players: 1 – 100
Playing Time: 20 – 30 minutes
Official Website: Voyages (postmarkgames.com)
Release Year: 2021
Price: 5 USD / 4 GBP
Initial Content:
Full Color / Low Ink Game Sheet Map 1 (A4, Letter Size)
Rulesheet Map 1
Map 1 Score Table for Voyages Title
12 Challenges
Additional Contents:
Full Color / Low Ink Game Sheet Map 2 (A4, Letter Size)
Rulesheet Map 2
Full Color / Low Ink Game Sheet Map 3 (A4, Letter Size)
Rulesheet Map 3
Full Color / Low Ink Game Sheet Map 4 (A4, Letter Size)
Rulesheet Map 4
Full Color / Low Ink Game Sheet Map 5 (A4, Letter Size)
Rulesheet Map 5
Campaign Sheet (A4, Letter Size)
Rulesheet Campaign Mode
About Voyages Print & Play Game
Even before this one, there are a lot of Print and Play Games we can find on BoardGameGeek.com. The idea is anybody can print their own game components and maybe with additional generic game pieces like dice or cubes, people can play those games.
A lot of them are free. Maybe the designers just want to share their love of gaming by opening access to their work. Some of them are offered as a way to playtest the game, maybe giving players a chance to try before buying a retail copy or from crowdfunding campaigns.
Then, in 2020, pandemic happened which hurt a lot of industries including tabletop gaming. Not only this prevented people to get together and play games, but production chains were also affected as well. Game publishers were having a tough time, not just to produce a game but also to ship them anywhere. The price of a game went up even after a lot of delays.
Matthew Dunstan and Rorry Muldoon then came out with a solution which became a trend. They started offering a PnP, roll-and-write game called Voyages via Kickstarter Campaign.
This way, people can print the file and play the game right away. For those who don’t like printing those files but still want to play digitally, they even made a video of how we can play them on tablet.
What makes them different is that they made a promise that whoever pays that one-time cost, will get the digital contents and all future contents should they keep making them. It’s like we pay for a base game but we will also get the expansions.
It turns out, the campaign was a success. They got almost 13,000 backers, generated over 50,000 GBP that were willing to pay for a 4 GBP (5 USD) PnP game. Backers got access to the Dropbox folder to download the files.
During the Kickstarter campaign, there were only 2 game sheets for Voyages. Over the course of 1 year, the designers have released 3 more additional sheets and a Campaign mode to play. Non backers can now go to the publisher’s webstore to pay for the same price and gain all of those contents.
On their Discord channel, some fans of this game even created and shared their own Game Sheets using the same basic idea with a couple of twists. This is a great additional value for that price, if we don’t mind with this print and play model.
Since then, a lot of other designers have started to follow this path. Nowadays, we can find a couple of similar projects on Kickstarter every week.
In 2022, Voyages was #196 on People’s Choice Top 200 Solo Games voted by the community. Players can also participate in the monthly Solo Challenge for this game.
More about Voyages Game Itself
As mentioned before, Voyages is a roll-and-write game. Usually, in this genre, we will roll one or more dice and make decision based on the roll results.
In the case of Voyages, thematically, we are playing as a Captain of a ship sailing through open seas. We have to navigate carefully to pick up cargo, new crews, explore different part of the oceans, land on islands or even face some dangerous along the way.
The gameplay is simple. Every round, we roll 3 d6 and assign them for 3 different purposes. One is to determine the direction, two is for speed of the ship and the last one is for duties on the ship itself.
For the direction, value one is going to north, 2 for northeast, 3 for southeast, 4 for south, 5 for southwest and 6 for northwest. Speed means how far the ship will move on the chosen direction. With 1 just 1 space up to 6 spaces for 6 and it has to be that value.
The duties with the last die is just for filling up tracks. If we complete either row or columns of that tracks we can gain some resources like different types of cargos , sailor or even heroic sailors.
Collecting cargos is just to gain score with different set collections. Once we have collected them, we also need to land on an island to sell them to gain points.
Getting sailors is to help us change the die value. We can spend one sailor to change the value up or down by 1 for a die. If we have a Heroic Sailor, we can change the die to any value.
Being able to change the value is very important. There will be times when the dice rolls just give us bad result like all 3 dice having the same value. If we don’t change them, we will have no option to use them differently.
So, not only this is a resource management game but also a dice manipulation game.
In multiplayer mode, the end game is triggered once a player gained their 3rd Legendary Star for completing tasks or objectives. Players will then play the final round then count the score to determine the winner.
For solo mode, the game is played only in 16 rounds. To win, we also need to gain at least 3 Legendary Stars.
At least those are rules for the 1st Map or 1st Game sheet. The other maps may have additional rules while keeping the idea of using 3 dice every round.
This first Map is only about collecting Cargos and Sailors with a bit about fighting a Pirate. In the 2nd Map, Marauder’s Reef, we can hunt more Pirate Ships. Completing the right duties will open more chance to manipulate the dice, unlock special ability and power to defeat those Pirates.
The 3rd Map, Cold Dark Depths introduces the idea of player elimination. We will be trying to spot dangerous sea creatures. If we don’t play it careful enough, they can destroy the ship before the game ends.
The 4th Map, Lighting Beacon Bay is actually back to just exploration. But this one improves the idea of the Sailor. Sailors can be placed on different rows that later can be activated for different abilities of the corresponding row. One row can extend the Speed while the other is about getting additional movement while changing the direction.
The 5th one, Race at Coral Rock is probably the most complex one so far. In this one we have to maneuver the ship through narrow reefs, discovering hidden shipwrecks behind those reefs. This one is a bit challenging as we more often than not need to have the right die value for the direction.
With these 5 Maps, the designers introduced the CAMPAIGN mode to play through all 5 Voyages. In this mode before each Voyage, we have to pick a QUEST. Each quest will give 1 additional objective. If we can complete them, we can get more reward at the end of the session.
The Legendary Stars we have collected every session, including the reward from completing each Quest, can then be spent for UPGRADES. We can either upgrade the ship or the crew which will be active in every future Voyages.
The Campaign also introduced the idea of NEMESIS. Different Nemesis will prevent us from using different abilities or benefits of the subsequent session.
In December 2022, the publisher announced that the 6th Map is under development.
Components
I’m going to discuss here the components that we need to have in order to play Voyages in physical form, not digitally. Hopefully the video above from the publisher themselves was enough to describe how to play the game digitally.
This game is meant to stay as Print and Play game. There is no official produced copy with a box from the publisher. Fans of the game have created their own box and design like this one.
If we purchase the file, they will also send us a box cover design, the publisher’s logo and a label about the game. The label will say the number of players, target audience’s ages, and estimated playing time.
All of the sheets were designed to be printed on a paper with the size of either A4 (210 × 297 mm or 8.3 × 11.7 in) or Letter size (215.9 × 279.4 mm or 8.50 × 11.00 in). We may fold the sheet for rules but the Game Sheet is meant to be a single complete sheet.
So, if we want to create our own game box, that would be the minimum footprint size of the base box. If we choose to laminate each Game sheet, usually we want extra room for all sides. We might want to leave extra space if we also want to store dice and writing utensils.
How tall the box should be depends on how many sheets we want to put them in. Standard game box usually has about 7 cm or 2.8 in tall. That is equal to about 700 sheets depending on how thick each paper is.
Some people prefer to just print the sheets on paper and keep them on a binder. Fo the Gamesheet where we will write something on, they insert the sheet into a document sleeve, no need to laminate them. Both options are for using dry erase markers.
Additional Components
With a print and play game, we may need to provide additional components. In this case, we need 3 standard d6 and 1 writing utensil for each player.
The dice are just standard 6-sided dice with pip values from 1 to 6, not a custom dice. Regardless of the player count, we only need 3 d6. Each round, we will roll these 3 and every player will make decision based on the same roll result.
The game provides a way to manipulate the dice but the change happens and works just for the player. While the other players will still use the initial result.
This is why this game is considered as a multiplayer solitaire game. What one player does on their sheet doesn’t really affect the other. Of course, the other player can play a separate game and roll their own dice in which they may need extra 3 dice.
If we don’t want or cannot use physical dice, we can just go to Google and type in “roll 3 d6”.
As for the writing utensils, it depends on whether we want to laminate the sheet or just one time use of the Game Sheet. If we choose to laminate, we can use dry erase markers and just clean the sheet after the game ends. For one time use sheet, then we can use just a pencil or pen. I personally like using color but just black color works.
In the game of Voyages we are just drawing lines and writing numbers for score, make a circle and crossing icons. There is no erasing the previous lines, just overlap the previous lines. We can still undo our most recent decision like doing take backs. I guess this is why using regular pen for one time only is not recommended.
Technically, players can still just use one utensil, take turns and wait. Well, it’s not really a good thing when playing with more than 2.
Rule Sheet
If we purchase the game, one of the digital file that we will get is the Rule Sheet.
Currently the official rule is available in 15 different languages: English, Japanese, Finnish, French, German, Greek, Brazilian Portuguese, Hungarian, Italian, Japanese, Korean, Polish, Russian, Spanish and Turkish.
Maybe they will keep adding more in the future.
On BGG page for this game, the designer shared the English version in the File Section. However, it seems not rule of every Map is available at the moment. There is one unofficial translation to Chinese as well.
There is no need to print the rule but if we sometimes need to check on certain clarification. Of course, we can just look at the file digitally but need a bit more effort if we also use the device for the dice.
The rule sheets themselves are just black text with some icons and no art or color on the background. They are written horizontally in 3 columns between 2 to 3 pages per map. Some people choose to fold them.
I kind of wish that there is a way to help people tell them apart. Maybe with a big icon that represents different maps at the corner or something. I guess I can just put a color. Otherwise, I have to find the front part and read the Map number the rule is for. I guess I should have kept them as one rule in one place.
The thing is, this game promises to keep adding contents or maps with more rules. People will usually wait until they have everything before trying to combine it into one. Otherwise, they combined the existing ones and turns out leaving out just one more map.
Another issue is that besides the rule for Map #1, the subsequent rules assume that we have read the rule of the first one. So, if we only choose Map #4 and print rule #4, new players may not be able to play the game.
While the other maps are playable as standalone games, the rules for each are treated like rules of an expansion.
The rulesheet for Map #1 has 2 pages. The first 2 columns are for the basic idea of the game that works for all of the other Maps. Then the rest of the rules are almost specific just for Map #1.
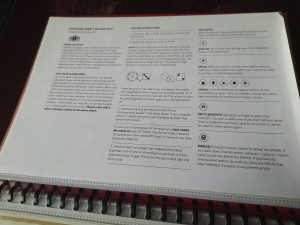
Here is the table of contents for this rule sheet for Map #1.
Title and Logo (1st Column). They put the matching title and logo as printed on the Game Sheet at the top left corner. This is to help us find the corresponding rule for the Game Sheet we are using to play.
It will also tell us the version of the rulesheet. My file says v1.2. While it is very unlikely that they will change but they could. The problem is, we will not know whether this is the most updated one if we only have the printed rule. If we have access to the download link, we need to at least keep checking.
How to Play (1st column). This is more like a summary or brief description of how the game is played.
The Dice & Sailors (1st column). This explains how the dice manipulation mechanism works for this game. However, it doesn’t explain when exactly players can exhaust the sailor. The restriction of using sailors is only up to the amount we already have. We can use one or all of them to one die or multiple dice.
The change for dice result can wrap around. This means we can add 6 into 1 and vice versa. So, at most, we only need up to 3 sailors to change 1 value to any value.
Round Structure (2nd Column). This explains all we need to resolve every round. Roll the 3 dice, use one die for the direction and another one for how many spaces to move. Then use the last die for duty. After that carry out Action if we land on an icon. Lastly, check whether the endgame has been triggered.
They should have pointed out that during using the dice, players can exhaust the Sailors to change the die /dice values for their own sheet. Doing this doesn’t affect the dice for the other players. The other players will still use the same initial roll.
An important note is how we can land and depart differently from island with multiple hexes but treat those hexes as a single island for the action. Also, we have to land exactly on an icon in order to do the action. We do not get the icon from the spaces we have travelled through.
Actions (3rd Column). This section explains what we can do when we land on an icon on the map for each different icon. Well, they didn’t explain what a number on an island means, even if it is just points and not an action players need to resolve.
Action, at least for this map, is more like what we can get if we land on the icon with the requirement. If we can get them, there is no reason not to, mostly. The choices are probably for selling cargo, whether for all of 1 type or 1 for each type.
One important note is about the Relic. If we land on Relic but without unexhausted Sailor, the relic is lost. It’s not that we can go back after getting a sailor and try to make the sailor heroic. That means, once visited, the relic is gone.
Another note is about the Dread. If we land on Dread but without 2 Heroic, we have to exhaust a sailor. Unless we also don’t have any sailor in which case we do nothing.
Cargo (4th column). This section explains how we can fill the Cargo section of the Game Sheet which is the bottom middle section. Unfortunately, this section doesn’t have pictures to give example visually.
A couple of notes from this section. First, we create a circle for each Cargo in the corresponding type to indicate we gain them. After getting any cargo, we can visit an Island with settlement to sell one or more Cargo. Selling means we cross that circle and has to be done from left to right for each type.
We can only sell one type but all or one cargo of each type in one settlement. Settlement will only buy our cargo once per game. So, once we have visited and sold some Cargo, we cannot return to that island again to sell more.
The rule about settlement is a bit unclear. There are 2 separate things we can do in settlements. One is getting sailor which will happen regardless of selling cargo or not. The other is about selling the cargo.
What’s unclear is that on forum, one person said that after visiting that settlement even if we didn’t sell anything, we cannot use it again. Another source said that we can still come back and then sell if we haven’t sold anything on it but getting sailor already happened in the first time.
According to the ACTION section, once a settlement has been used for action it cannot be used again. However, the text seems to imply that even just getting sailor is already an action.
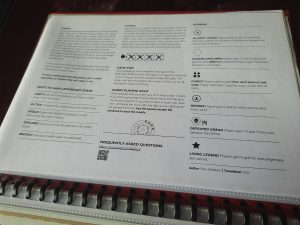
Ways to Gain Legendary Stars (4th Column). Getting Legendary Stars is how we can trigger the end of the game in multiplayer mode. In solo variant, we have to get 3 as objective in order to win, in addition to getting score.
Different Maps will have different way to gain these Stars. For Map #1, there are exactly 5 ways: CARGO, DUTIES, DREAD, EXPLORE and RECRUIT. The Game Sheet itself will tell us all of them. So, this is more like a clarification.
Duties (5th Column). This is how we can use the 3rd die of every round to fill in the duty track. The important note here is that if we cannot use the die, we have to skip or ignore this part. Also, it is possible to complete both column and row in the same round, in which the player will gain both bonuses.
Game End (5th Column). This explains how the end game can be triggered and how the game ends, followed by determining the winner.
Once a player gets their 3rd Legendary star, the end game is triggered. Finish the round and play one more round. The player with the most Gold (points) is the winner. Apparently there is no tie breaker so tied players share victory.
When Playing Solo (5th Column). This solo rule is just that we will only have fixed number of rounds, which is 16. The rule suggests using space in the windrose to track the round and the section shows an example of how to use it.
Frequently Ask Questions (5th Column). Here they put a URL that we can click digitally. It will send us to an FAQ page on BGG. The QR code is the same that we can use using our phone with the printed rule.
Scoring (6th Column). This is a bit elaborated version of what we can find from the Scoring section of the Map 1 Game Sheet (top right).
I think the important note from the rule is about the OCEAN EXPLORED scoring. The rule emphasized to count different unexplored Ocean region once. Some people assumed it is the number of hexes, which is incorrect.
The scoring from CARGO is also a bit unclear since they don’t use the same terms between items, cargo, piece. According to the FAQ page, the sold cargos means sold items which one type of cargo can have up to 3 sold items / cargos. The scoring stack ups, if we manage to sell multiple of the same type.
While there are a couple of details missing from this rule sheet, it’s not really a game breaking rule if players decided to have their own resolution. As long as all players follow the same rule. Players may not even realize that they interpret incorrectly and the game is still functional.
I appreciate that they put a link and QR code that can send players to the FAQ thread on BGG. Some people there have been very actively helpful but I still find some inconsistencies for a few things.
Game Sheet (Map #1, Trade Wind Blows)
For each Map, there is only one variant. The only variants from the digital files are about the size of sheet and whether we use the full color or low ink version. The low ink is just black and white. While the Full Color version will have blue or green color on the playing field section or hexes and light sepia color for the rest.
I remember that they did update the Game sheet but only about the interface, specifically for the scoring section after getting some feedback from players.
Each player will use the same sheet and start from the same position. This means, what makes it different from one game to another using the same sheet is the different dice rolls for each round and how we make decision for each roll.
Playing with the same dice roll might end the game with almost the same result. This is true especially for the experienced players as they already have in mind the best course of action.
Of course, this is not going to happen. We will always use random roll. This might become a problem if we play using the same dice in community monthly challenge multiple times. By changing one set of dice from all rolls of any random round can significantly change the result.
As the Game Sheet is the mainly only component of this game, each Map has a couple of sections: Playing Area, Score Section, Sailor Section, Duties Section, Windrose, Legendary Star Track, Map’s Title and Logo, and lastly the Cargo Section.
Map’s Title and Logo
Let’s start from the top left most part of the Game Sheet. All Map will always have this section but with different detail. Here we can find see a big icon that looks like a ship with a big sail. The Sail itself has a logo that represents the Map. Different Map will have different logo on that sail.
For Map #1, it seems the logo shows a Barrel icon which represents the Cargo Scoring that is unique just for this map. Right below the Ship logo, we can see a banner and a text. On Map #1, the text says TRADE WINDS BLOW.
So, if we find different sheets, we can check which one each of them is by at least reading the title even if we don’t get the icon on the sail. After that, we can look for the corresponding rule sheet to learn. Each rule sheet will have that title and the logo on sail printed in the top of 1st column.
Well, the rule doesn’t say but it seems we are supposed to write our name on that banner to know which one is ours if we play with other people. Players can also draw their own icon if they want as the space is big enough.

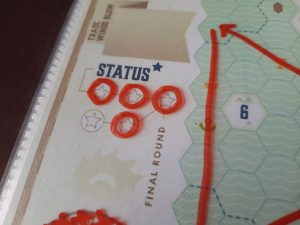
Legendary Star Track
Right below the title and the Map’s logo, we can find this track for Legendary Star. It says STATUS and a Star. After that, we can find 5 circles, each with a star icon inside the circle.
In this game, we will try to gain up to 5 Legendary Stars through several ways. Each Star is worth some points at the end but it will also determine when the game should end.
Everytime we gain 1 Star, we keep track by making a circle on one of those stars in that section. Notice that there is a line that starts from the word Status that connects to all 5 circles one by one. We are supposed to start the circle from the one closest to the word Status, following the connecting line.
Also, on the third circle there is a vertical text that says FINAL ROUND. This means when one of the player gains their 3rd Star, the endgame is triggered. After that, players will finish the current round and play one last round before they proceed to scoring. Players can then use that final round to gain the other 2 more Stars.
In Solo mode, the player must gain 3 Stars within 16 rounds in order to win.
With how the end game is triggered, the multiplayer mode doesn’t have an exact number of rounds. Actually, even all players can keep dragging the game without any player triggering the end.
Some people don’t like that idea. However, they can easily just play the solo variant to limit the length and then compare the score.
There are exactly 5 ways to gain a Star from each. We can read it from the rulesheet or look at a star icon on the Game Sheet itself.
One, CARGO. Sell the third piece of one type of any Cargo. Only 1 Star can be gained from this way but players can keep getting more points from selling more cargo. We can see that on 3rd space of each cargo type has a Star icon in it but with an asterisk.
Two. DUTIES. Complete the middle row of the duties track. This track has exactly 6 spaces with a number from 1 to 6, one of each. By completing the row, each player can get 1 Star plus 1 cargo of any type.
Three. DREAD. Defeat the DREAD on the Ocean Space or Playing area by landing on that icon and exhaust 2 Heroic Sailors.
Four. EXPLORE. End the turn on the Ocean space with a Legendary Star. There is only 1 star on those hexes at the top right corner area.
Five. RECRUIT. Gain 12th Sailors (6 additional Sailors). The 12th Sailor space will have that Star icon at the top right corner as reminder.
Windrose
The next section below that Legendary Star track is the Windrose and Round Tracker. We can see a big circle with smaller layer and inside that layer there are numbers from 1 to 6.
These numbers are the main gameplay mechanism. They determine the direction where the ship can move on the map. The Map itself is made of hexes. So, the number indicates which side of the hex the ship will move toward. With 1 going up or top, then going to the right.
In this game, each round we will roll 3 dice. We can use one of them for the direction, following the number stated by that Windrose. One of 2 remaining dice will determine the speed or how many spaces in that direction the ship will move.
It’s a die roll so there is randomness or luck factor involved. We may want to go to the right but none of the dice is pointing to that direction. Even all 3 dice might show the same number or result and we have less option to use. This is even worse if the ship is on the border hex so that the ship has less options for direction.
In that case, we have to change the value of the dice, mostly by exhausting one or more Sailors. Each regular sailor that we have can be exhausted to change 1 die value +/- 1. The numbers can even wrap around from 1 to 6 and vice versa.
If the Sailor is a Heroic, exhausting a Heroic sailor allows us to change 1 die to any value with just 1 sailor. In the case that we have no sailor and cannot use any combination of the dice to move then we basically waste a turn.
Which is why always having a sailor can be useful. This becomes a kind of resource management game. Or, we can just be more careful before moving the Ship to the border area as the border doesn’t wrap around.
The game encourages players to plan maybe one or two steps ahead. Or maybe have alternative plan, after going to one space. The same 3 dice result may offer different combinations. We can have even more options if we have sailors to change the value.
Round Tracker
Between the inner and outer circle of the Windrose, we can see that the space is divided into 16 sections. We can use this to keep track of the number of rounds in solo mode.
Before rolling the dice each round, we cross off one of the spaces. If there is no more empty space of this round track, then the game ends immediately.
Officially, there is no purpose of this tracker for playing the game with multiple players. However, players can also just play the solo variant, using the same dice input and then compare scores.

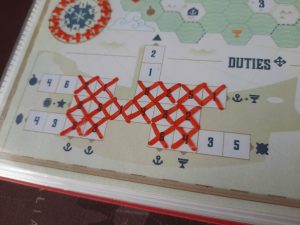
Duties
This one is the bottom left most of the Game Sheet, Map #1. As we can see the section has a couple of rows and columns of boxes with 1 number. At one end of each row or column, there are one or more symbols.
In this game, every round we will be making decision to the 3 dice rolls. Two of them will determine the movement of the Ship while the remaining one is to fill one box of this DUTIES section. We cross off the box that has a number that matches with the die face we chose to fill this section.
Once we have completed or crossed off every box in a single row or column, we can get the reward stated at the end of those rows or columns. We can get either one type of Cargo, a Legendary Star, Sailor, Relic or Heroic + Relic. Some of the boxes are the intersection between a column and a row so completing one may help on completing the other.
Basically, this is like playing a game of Bingo and crosswords (or numbers). The numbers and the placement are predetermined. We can choose which die or face value to use and which box to cross off first.
There are a total of 24 boxes with 5 rows and 5 columns to complete. Since we can only fill one box per round, we need at least 24 rounds to complete them all. It may take more if we don’t get the right die roll and the means to change the value.
Obviously, the solo mode with just 16 rounds, we will not cross off them all. We have to prioritize some rows / columns first.
Each number from 1 to 6 appear 4 times equally. Here are the lines we can try to complete and the reward from each.
Row 1
Reward: 1 Fruit Cargo
Requirements: 4, 6, 2, 1
Row 2
Reward: 1 Barrel Cargo + 1 Legendary Star
Requirements: 6, 5, 1, 4, 3, 2
Row 3
Reward: 1 Gem Cargo
Requirements: 4, 3, 5, 3
Row 4
Reward: 1 Sailor + 1 Relic
Requirements: 6, 2, 5, 1
Row 5
Reward: 1 Hide Cargo
Requirements: 6, 4, 3, 5
Column 1
Reward: 1 Sailor
Requirements: 2, 6, 5
Column 2
Reward: 1 Sailor
Requirements: 1, 5, 3
Column 3
Reward: 1 Spice Cargo
Requirements: 2, 1, 6, 4
Column 4
Reward: 1 Sailor
Requirements: 2, 3, 6
Column 5
Reward: 1 Relic
Requirements: 5, 2, 4
We definitely want to get the Sailors first. Having more sailors can give us a Legendary Star. They will also give us flexibility to get specific die value so it will be easier for us to complete the other boxes. Relic is nice but we need to have Sailors first.
While the rest of the rewards are just Cargo. Having Cargo and assuming we manage to sell them means just end game scoring. They don’t necessarily give us more option while playing. Of course, at certain point of the game, we might land on an Island with Settlement. In that case, we want to have as many Cargo as possible, either 3 of the same kind or 1 of each kind, which makes it 4. That is still just end game scoring.
At least the one row in the middle that can give us a Legendary Star is a must. Since it is at the center which becomes intersections with all columns, more often than not, we will get it, even if it requires 6.
The question is, for each number, which box of that number should we cross off first? While each number appears the same number of times but the dice roll may not show the same number of times for each.
Value 1. I probably would go with Column 2 first for Sailor. Then maybe Row 4 for Sailor + Relic. Row 2 will eventually be completed. While Column 3 might be the last which is just for Spice Cargo.
Value 2. I probably would go with Row 4 for Sailor + Relic first, which could lead to another Sailor from Column 4. Row 2 next for Legendary Star. Then Column 1 for Sailor and lastly Column 3 for the Spice Cargo.
Value 3. I would go with Column 4 first for Sailor, which could lead to Row 2 for Legendary Star. Maybe Column 3. Row 3 and Row 5 are just for Cargo.
Value 4. This is probably the least useful number for Duty. None of them can give us Sailor, only 1 for Relic. While the one for Legendary Star is nice but that is also just an intersection to Spice Cargo.
Value 5. For 5, I probably would go for Row 4 for Heroic Sailor, which could lead to Column 5 for Relic. Next should be Column 2 for Sailor but could lead to Row 2 for Legendary Star. Then Column 1 is next for Sailor. The one in Row 5 should be the last.
Value 6. I probably would go for Column 1 first for Sailor and Legendary Star. Next one should be Column 4 for Sailor which could lead to Row 4 that requires another 6 for Heroic Sailor.
Even though I mentioned here my priority for each die value, it doesn’t mean that I will get the same number in a row before moving to another number. The other number might affect the next one that I would prioritize more. Back again to the idea of getting Sailor as soon as possible so we can spend them to get the other value subsequently.
From my experience with playing this game in solo mode, there is a good chance that I will not get any Cargo at all. At most I will get one and it is probably not the Spice or the vertical one.
There is still a small chance that we will keep getting the same number. The 3 dice roll may offer different values each turn. However, maybe 2 of them have to be used for movement and we end up with the same number.
If, let’s say we end up getting a 4 for duty, changing the value by +/- 1 per Sailor means we at most get to 3 or 5. Either we have to spend more or spend the Heroic.
Again, it could happen like one game over 10 sessions. But I did have that experience. It feels like the game can have too much luck.
Cargo
The next one is the Cargo section between the Duties and Sailors. Basically this is the section where we can keep track of cargos that we have collected and sold during the game.
The top part of the section has a reference for 4 different types of Cargo and about the Settlements.
Different types of cargos doesn’t really have different use or ways to score, only different icons. Everytime we get any of the cargo, we keep track on the corresponding section of that cargo. At the end any type will give us the same scoring potential.
The four different types of cargos are Fruit, Spice, Hide and Gem. There is also a Barrel icon which represents a wild cargo which can be any type.
In this game, we can get a cargo in 2 ways. One is from the hexes or playing area, by moving the ship and land exactly on a Cargo icon. The other way is by completing the rows or columns from the Duties section.
Players can get each type of cargo up to 3 items. One will be from the Duties while the other 2 will be from the hexes or playing area. There are 5 barrel icons on the playing area and 1 from the Duties section. This means there are more than enough icons to fill the Cargo tracks. It’s just it is very unlikely to get all cargos, including barrels if we play with solo or the limited number of rounds.
The bottom part of this section is the 4 Cargo tracks, one for each type. Each of them has 3 circles and above those circles we can see a number from left to right, 3, 4, and 5.
The way to use this track is, everytime we get a cargo, we make a circle or highlight the leftmost circle of the corresponding row. Making a circle means we get a Cargo.
We can then sell them by landing on an island with a Settlement icon. Settlement is an Island with what appears to be a House icon with an Anchor (sailor) icon. If the island shows a number or says START then it is not a Settlement.
To indicate that we have sold the cargo, we cross off that circle, from the leftmost. The number above the circle is the additional score we get for selling the cargo, not just getting them. If we sell 1 of one type, we will get 3. For 2 of one type, we will get 3 + 4. Having unsold cargo at the end is worth just 1 point.
This means, each type can give us up to 12 points and a total of 48 points for selling all cargos.
If we manage to sell 3 cargos of 1 type for the first time each game, we can get 1 Legendary Star. This does not apply for the subsequent 3rd cargo but we still get the points.
When selling a cargo on Settlement, we can choose between selling 1 of each type or all of one type. Also, once we have sold something on the Settlement, we can no longer sell anything else there. We have to land on a different island with settlement as well to sell the next cargo.
So, with this scoring mechanism and limited number of rounds, usually it’s better to just focus on one type of cargos. The third cargo sells higher. We also need to chase that Legendary Star for selling the 1st 3rd Cargo. Selling just the 1st or 2nd of any type won’t give us that Star.
Of course, the game may progress in a way that will give us different types of Cargo. In that case, we have to adjust the plan accordingly. But if we do get a choice by getting a Barrel, then it’s better to choose one type first.
As stated in the reference part of this Cargo section, visiting a Settlement will give us 1 Sailor even if we don’t sell anything. This is where the rule is a bit unclear.
Whether getting a Sailor and Selling cargos are 2 separate things or it can only be resolved once. Once activated, we are supposed to cross off the Settlement to indicate that we have used that one. So, if somehow we comeback to that island later, we do not use it again.
It seems the intent is that we can only activate the Settlement once. We either getting both benefit (Sailor and Selling) or just one. But there is no way we don’t take the Sailor in any circumstances. It’s just should we get it now or wait until we have a cargo first.
It may sounds like I make this issue bigger than it actually is. In practice, I usually don’t comeback to any of the visited island. The thing is that there are exactly 4 settlements which is the exact number to sell all cargos. I have not tried chasing the highest score this way.
With this same reason, it is very unlikely we get to reach more than 1 Legendary Star from this section. With solo that is. It is still possible to sell all 3 of 2 types though but I haven’t tried it yet.

Sailors Section
The next section at the bottom right corner of Game Sheet Map #1 is the Sailor section. This is the resource management aspect of the game where we can gain Sailor and spend or exhaust them.
The purpose of each sailor is to modify the dice result. Spending 1 Sailor allows us to change the value by +/- 1. The change can also wrap around from 1 to 6 and vice versa but they won’t go higher than 6 or lower than 1.
This makes the game a Dice Manipulation game. Also works as mitigation if the roll is bad. The change happens before using the dice so it can be for movement or for duties.
If the Sailor is a Heroic one with a relic, spending that exact Sailor can change the die immediately to any number with just 1 Sailor. Specifically for Map #1, there is another purpose for Heroic Sailor, which 2 of them allow us to defeat the Dread.
At the end of the game, unexhausted Heroic Sailor is worth 2 Gold or 2 points. Regular Sailor doesn’t generate any point so maybe we should try to spend them all.
The change of die value after spending the Sailor only works for players that exhaust their Sailor. This way, the other players will still use the initial dice roll results.
As we can see there are 15 squares or we can have up to 15 Sailors. Each square has a circle inside the square and we can see a Relic icon in the middle of that circle.
The top 6 squares have clearer border straight lines while the other are in dashes or dotted lines and more opaque. This indicates that we start the game with 6 Sailors.
As we get more sailors during the game, we outline one of the squares with dotted line to indicate we have a Sailor. To spend or exhaust the Sailor we have to cross off one of the squares with clear outline.
We can also upgrade any of the Sailors that we already have but haven’t exhausted them into Heroic Sailor.
It is by getting a Relic icon, either landing the ship on Relic icon or completing a row or column that can give that Relic icon as the reward. Everytime we get a Relic, we make a circle inside that Sailor’s square that hasn’t been exhausted.
If we don’t have any unexhausted regular Sailor by the time we get a Relic, we will lose that Relic. It has to happen immediately or we forfeit it.
Notice that the 12th square from the top has a Legendary Star icon at the top right corner of the square. This means if we get 6 additional Sailors, exhausted or not, we will get one of the Legendary Star.
There are exactly 16 ways to get Sailors. 8 from the ocean, 4 from Settlements, 4 from Duties. To get Relic there are 12 Relic icons from the Ocean and 2 from Duties.
Getting to 12th Sailor for Legendary star is quite reasonable. I think I got to 16 once or more but most of the time, probably less. For Relics, most of the time I get like 3 or 4 Relic icons.
For me, the problem with keep chasing a Relic is, it feels like we want to keep the Heroics for end game scoring instead of using or exhausting them. Of course, we want to get at least 2 to defeat the Dread.
Beyond that, it feels unnecessary. I definitely had a couple of moments where I just need to change the value by 1 and the only Sailor that I got was a heroic one. In that case, it feels wasted. it’s nice to have some Heroic but there is a chance that we only need to change 1 die by 1 value and find a different combination to use.
Making sure to be flexible when filling Duties or for the movement seems more important than having Heroic.

Scoring Section
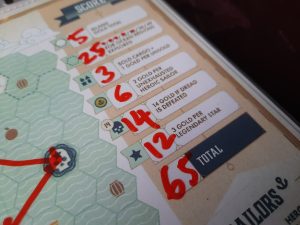
This is the section at the top right corner of the Game Sheet, which is where we tally the score from multiple aspects. The game and the sheet will mention the word GOLD which is essentially the points we are trying to collect.
As we can see there are 5 ways or rows to gain some points. The last row is where we write the total score.
Each of the scoring aspect or row will have a symbol of that scoring aspect, a space to write the total score from that aspect and a bit of description. Here are the 6 scoring aspects.
One. Gold from Islands. On the playing area, there are a couple of islands with a number on it. The number indicates the score or Gold that we immediately gain after landing our ship on it.
There are 6 islands with this category, each with different value of golds, between 3 to 8. The maximum score we can get from this is 3+3+4+5+6+6+8 = 35 Golds.
Two. Explored the Unexplored Ocean Regions. In the playing area, there are 7 different Ocean regions that have dash lines as the border of those regions. Players earn 1/4/9/16/25/36/49 points or golds for each different of these regions that the players have traveled to or through.
So, the more regions they visited, they will gain more points per region than previously. The highest score from this section is 49 Golds.
Three. Sold Cargo + 1 per unsold. Sold cargo means the player must have the Cargo first and then during the game visited a Settlement for the first time. The amount of Gold that the player gain is equal to the number above the Sold Cargo. They stack up for the same type of Cargo.
This means, for each type, players can gain 3+4+5 = 12 points. If they manage to collect and sell all Cargo the maximum score from this aspect is 48 Golds.
Four. Unexhausted Heroic Sailors. This means, players must have sailors first and then upgrade them to Heroic by getting a Relic. If the players can end the game without exhausting the Heroic sailors, they can gain 2 Golds per each unexhausted Heroic Sailor.
While we can get a total of 15 Sailors but there are only 11 Relics to upgrade them. That means the highest Gold we can get from this aspect is just 22 Golds.
Five. Defeated Dread. If we can defeat the Dread, we will get exactly 14 Golds for this aspect. This will then take away 4 Golds from the Heroic as we need to exhaust two of them to defeat this Dread.
Six. Gained Legendary Stars. Players gained 3 Golds for every Legendary Star earned. There are only 5 ways to gain exactly 1 Star each so the maximum points would be 15 Golds.
Based on the maximum number of each above, technically each player can gain more than 150 points. However, that is probably very unlikely to happen, at least if we play with solo mode.
The developer has published a scoring chart that we already get the highest points possible if we score like 80 or more points. On BGG page, somebody posted a picture that shows 95 as the highest score with solo play. Half of them came from traveling through 7 different Unexplored Regions.
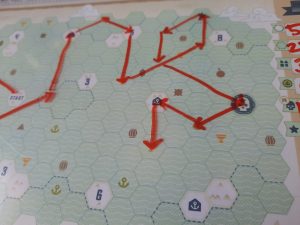
Playing Area
We finally get to the main section of the Game Sheet which I call the Playing Area. This is the section in the middle with a lot of hexes where we will move the Ship from the Starting Position through those hexes.
In the Full Color version, Map #1 will use a light green color on the hexes to indicate the Ocean part where the ship can move. Then we have hex or hexes with white color that indicates an island where the ship can land on.
For the Low Ink color, the Map will have white for Ocean while the island with have a curved border line within the hexes. Somehow for me, it’s a bit hard to tell the difference between just land and water in a glance. I prefer the colorful version. Maybe if the island has filled pattern for the hexes, it will make them pop up more.
From the Ocean part, there are 7 regions with what seems to have a darker color, bordered by dash lines. The darker color comes from the dots within the hexes. This represents the Unexplored Ocean Regions for a different scoring opportunity.
There are 3 regions at the top border, another 3 at the bottom and one in the middle. Next to any of them, there will be at least 1 island. This makes it harder to reach each region because the straight line from one to another usually will be blocked by those islands.
The size of this playing area is about 19 columns and 11 rows of hexes. This means, we can go from one side to the opposite side by using 2 6s as the speed. There are a couple of columns without any island but going from leftmost to rightmost or vice versa, there will be at least 1 island in between.
Also, the Ocean part doesn’t wrap around. So, if we hit any hexes on the border outwards, we will just stop the movement, instead of instantly teleported to the opposite site.
This means, when in any of the hexes on the border, we will have less option for movement direction. We might need to have a couple of Sailors to change the direction.
This Playing area has about 13 islands, including the Starting Island and the Dread. If we point the ship movement towards any of them, we will stop the movement on that island and land on it even if the speed allows us to move more spaces. This could be both a challenge or opportunity during the game to utilize dice with certain value.
Each island will have something printed on it and we can do some action when we land on them.
START island is just where we start the game and no other use. After that it works as an empty island. Players will always start there in any session. The different dice roll will be the one to change how the game progresses.
DREAD island actually has a punishing aspect. If we don’t have 2 Heroic Soldiers when landing the ship there, we have to lose or exhaust any existing regular Sailor. Once the Dread has been defeated by 2 Heroic Sailors, the land will become an empty island.
If the island has a number, this means the island has a GOLD with the stated number as the value. We just need to land and gain end game points. There are exactly 7 islands with Gold each.
If the land shows a house icon with an anchor /sailor icon, this represents a SETTLEMENT. When we land our ship on it, we can choose to activate the action or not. Activating means we can get a Sailor and sell cargos. Once activated, we are supposed to cross off the settlement.
This is to remind us that we cannot use it again, should we land on it again later. The land becomes empty. We can just take the sailor if we don’t have any cargo but we forfeit our chance to do it later with that same settlement.
As mentioned in the Cargo section above, we can either sell all cargo of 1 type or 1 cargo of all types. There are exactly 4 Settlements we can visit.
Besides the Island we can find a lot of different icons floating on Ocean part of the Sheet. This can be any of the Cargos, Sailors, Relics or a Legendary Star. We can gain any of these resources if we stop the ship movement exactly on the icon, not passing through. Once taken, we are supposed to cross it off as well to remind us that we cannot take them again.
There are 8 Sailors, 11 Relics, 14 Cargos (2 of each type of cargo and 6 Barrels / Wilds). If we divide these hexes into 2 halfs, left and right, each type of cargo will have one on each. However, there are only 2 Barrels on the left half but 4 on the right.
Sailors are almost equal between left and right. Maybe leaning towards more to the left. Relics, however are more available on the left.
Based on this distribution, Starting on the left half, a Legendary Star and Dread on the right, we are encouraged to explore to the left most side first before moving to the right. Again, at least by playing with the solo mode, that is probably the most efficient way.
The problem with going to the right first is about defeating Dread which requires having 2 Heroic. I think it is easier to get them on the left. Especially if we get a 6 right from the start and either a 1 or 4.
It is still possible to get them on the right but then we are losing the chance to get the other things. We probably also have to spend a lot of Sailors to maneuver a lot and stop on specific position that has an icon.
Maybe that is the point of this game, or this Map at least. There are too many options to chase on the right. By going to the left first, we can narrow the options down. But those resources probably shouldn’t be the main target.
Maybe the Unexplored Region should be the most valuable part we should chase. We can still get any of the resources on the right but not those regions. And for regions, we only need to pass through, not exactly stop on specific hex.
The type of Cargo we collected on the left should determine which type we should be collecting 3 for the Star. I mean, when choosing for the Barrel that we get along the way to the right.
Of course, this “best” path works if we get, or always get the best combination of dice. It makes me think that maybe if we only play to chase the best score, we might get frustrated for not getting the right dice. Sure, the game offers a way to mitigate but it doesn’t mean it is not limited.
Considering that the board or this playing area doesn’t change, nor the way to score, I can see that someone can find the objectively best path. Everytime I play this game, I somehow wish that there is a randomizer to change the state of playing area. Maybe with the same amount of object but different position of each.
Cartographer, a different game has done this and we can print another sheet with different setup. I can see that Voyages can have the same thing.
That will give the game unlimited replay value. As it is, the only replay value is by just playing tactically using the dice that we get randomly.
Map 1 Score Table
In the ADDITIONAL ASSETS folder, the publisher release Score Table for Map #1. We can earn a descriptor based on the number of Legendary Stars we gained and the Role based on the Gold / Score we earned during the game.
There is no additional rule to achieve any of these. This is just a reference to encourage player to do better in playing with Map #1. No need to print them out to play.
Here are the titles.
Descriptors based on Legendary Stars
0 Star: ABYSMAL
1 Star: SEASICK
2 Stars: UNSUNG
3 Stars: VALIANT
4 Stars: EPIC
5 Stars: LEGENDARY
Roles based on Golds
<40 Golds: MARINER
40 – 49 Golds: NAVIGATOR
50 – 59 Golds: VOYAGER
60 – 69 Golds: ADVENTURER
70 – 79 Golds: TRAIBLAZER
80+ Golds: CHAMPION
So, if we scored 50 points with 4 Legendary Stars, the title would be EPIC VOYAGER.
12 Challenges
Right after the initial release in December 2021, the designer run 12 day challenge to play Voyages Map 1. Each day will have one additional objective we need to achieve in order to win the game.
Here are the challenges.
1st: Gain 1 Legendary Star from the Ocean
2nd: Visit and use exactly 2 Settlements
3rd: Cross off 3 Sailors before you start the game
4th: Gain at least 4 Cargo from Duties (The Barrel also counts)
5th: Finish the game with at least 5 unexhausted Heroic Sailors
6th: Visit at least 6 different unexplored Regions
7th: All Islands are worth 7 Golds instead of their usual Value (except for Settlements)
8th: Sell at least 8 Cargo
9th: Collect all 9 new Sailors
10th: Collect at least 10 items from the sea (cargo, sailors or relics)
11th: Score at least 11 Gold from islands and 11 Gold from Cargo
12th: Collect all 12 Cargo (you don’t have to sell them)
I think some of these are easier than others. For the easy ones, we probably can complete more than one. We can just choose any of them randomly or play using one at a time from the 1st to 12th.
That is it with all of the components we need to have to play Voyages. Even if I only discuss the Map #1. We can now learn how to use them to play the game.
How to Play
Voyages can be played from 1 to any number of players, even though somehow the publisher set the limit to 100. Each player just need to have a single Game Sheet.
Players can play competitively using the same Game Sheet for each player individually. Any player can trigger the end of the game and then they will compare score.
Alternatively, they can also play using the solo variant that will last 16 rounds and then compare score at the end. Technically, with this variant, each player can also play with different Map but they cannot compare score then.
What I’m going to discuss here is how to play the game with the physical component. This is specifically just to play with Map #1. The other Map will have their own rule change from the 1st Map.
This next video is the solo playthrough video for this game by the designer.
Setup
1st. Each player takes 1 GAME SHEET with the same Map and 1 writing utensil.
2nd. One player will take 3 6-sided Dice. This player will roll all 3 dice for all players every turn. Regardless of the player count, we will only use 3 dice.
3rd. If playing with the solo variant, fill 1 space on ROUND TRACKER around the Windrose to keep track of the 16 rounds.
That’s the setup and we are ready to play the game of Voyages.
Gameplay
The game of Voyages is played over series of rounds, 16 if we play with the solo variant. Each turn, 3 dice will be rolled and each player will make decision for their action based on the same dice roll result simultaneously on their own Game Sheet.
The Round Structure will have 4 steps.
One. Roll 3 D6
Two. Pick 2 dice to Move Ship
Three. Use the last die to fill the Duties
Four. Resolve the Action
During Step 3 or Step 4, one player may get their Legendary Star. If that is their 3rd Star of the game, the end of the game is triggered.
In multiplayer variant, once the endgame is triggered, players finish the current round and play one final round. After that, players will tally their Gold (Score) to determine the winner.
Otherwise, players will start a new round with the 1st step, roll 3 dice again.
Roll 3 d6
Each turn starts with one player roll all 3 d6. Players will use the same 3 dice roll result. Only 1 die can be used once each by the same player.
Each player has the means to change the value to any or all of them but it will only affect that player. So, nobody should physically change the initial value of those 3 dice.
Exhaust Sailor to Modify Dice
After the initial roll, players can exhaust their Sailor or Heroic Sailor to change one or more dice for the round. They can do as many times as they want to one or more dice as long as they have available Sailors.
Exhausting 1 Sailor allows player to change the value of 1 die by + / – 1. For exhausting a Heroic Sailor, player can change 1 die to any value. The die value cannot be modified more than 6 or below 1. But the dice change result can wrap around from 1 to 6 by -1 or 6 to 1 by +1.
After exhausting the Sailor, cross off the sailor box to indicate that we can no longer use that same Sailor. Exhausting a Heroic means losing that Sailor as well, not just the Heroic status.
NOTE: Remember that the change of dice value only affects the player who exhaust the Sailor. The other player will still use the initial roll or change them however they want, which can be different from one player to another.
Pick 2 dice to Move Ship
From the initial and the modified value, players should pick 2 dice to move the Ship. One die will determine the direction and the other die will determine the Speed.
The direction follows the number in windrose system. 1 means going up, 2 to top right of the hex and so on until 6 to top left of the hex. Speed means the number of space that the ship will move from the current position.
Players will then draw a straight line from the current hex position to the destination based on those 2 dice. We have to move the whole distance based on the speed. Or move less than the Speed for any these 3 situations below.
One. The ship moves onto an Island.
Two. The ship moves onto the DREAD space.
Three. The ship hit the edge of the map / Playing Area.
An Island is hex or hexes with white color (non Ocean color), or the hex with the inner border if we play with the Low Ink version. DREAD space is the only hex with the Skull icon on the map.
The map doesn’t wrap around on the edges, so it’s like hitting a wall. This is different from the island since the island will be in the middle of the Map. In the next round after landing on an island, we can still move to any direction from that Island. While with the border or hex on the edge, we can only move inwards.
If we land on an island with 2 connected hexes, in the round after that, we can depart from that island from a different hex that we landed from previously.
Use the Last Die for Duties
The Duties section of the Game Sheet has 24 squares, each with a single number. We can cross any of them once per game that has the matching number as the die (after modification) that we choose for Duties.
Once we have completed crossing off all squares in a row / column, we get the corresponding reward next to that row / column. It can be a Sailor, a Relic, a Legendary Star or any of the Cargo.
If it is a Sailor, we draw the outline of the empty Sailor space. This means we have 1 available Sailor we can use.
If it is a Relic, we draw the inner circle of the available Sailor space that still has not circle in the middle. This means that Sailor has been upgraded into a Heroic. In the case we don’t have any available Sailor when getting a Relic, we will lose the upgrade chance.
If it is a Legendary Star, we draw a circle in the leftmost available space on that LEGENDARY STAR track, following the line connecting those circles. Once a player gets their 3rd Legendary Star, they have to announce to the other players that the end game has been triggered.
If it is a Cargo, we draw a circle on the leftmost available space on the matching row of that Cargo track. This means we have a Cargo that we can sell on a Settlement later.
Completing a row or column can happen at the same time after crossing off one of the Duties space using that last die every round.
In the case when we cannot use the dice because no available matching Duties space, we skip this one and lose the chance to fill for that round.
Resolve the Action
This step of the round means activating the symbol on the hex or island where we stop the ship movement on.
On ocean hex, we can either find a Sailor, a Relic, a Legendary Star or any of the Cargo.
In any of these case, similar to when getting them from Duties section.
If it is a Sailor, we draw the outline of the empty Sailor space. This means we have 1 available Sailor we can use.
If it is a Relic, we draw the inner circle of the available Sailor space that still has not circle in the middle. This means that Sailor has been upgraded into a Heroic. In the case we don’t have any available Sailor when getting a Relic, we will lose the upgrade chance.
If it is a Cargo, we draw a circle on the leftmost available space on the matching row of that Cargo track. This means we have a Cargo that we can sell on a Settlement later.
If it is a Legendary Star, we draw a circle in the leftmost available space on that LEGENDARY STAR track, following the line connecting those circles. Once a player gets their 3rd Legendary Star, they have to announce to the other players that the end game has been triggered.
For landing on the Island hex or hexes, the icon may show either a number, a Settlement or a Dread.
If it shows a number, this is just end game score. At the end of the game, we will get GOLD (Score) the same amount as stated by the island. Players gain the Gold from the island only once per visited island.
If the island has a Settlement icon, there are 2 things, getting a Sailor and Selling a Cargo. Once we choose to activate the action, we cannot use the Settlement again and we should cross the icon off as reminder.
There is no reason not to get a Sailor but we can do it with or without selling any cargo. We can also choose not to activate at all. In that case, we can return later in the game and then activate it later.
Similar to getting Sailor from Duties or Ocean hex action, we draw an outline of an empty Sailor space. This is to indicate we have 1 Sailor we can exhaust later.
To sell a Cargo or Cargos, we first need to have one or more in the Cargo track. We have 2 choices of how we can sell Cargo. Either sell all of 1 type or sell 1 of each type.
In either case, we cross off the circled space of the sold cargos, starting from the leftmost of each type.
If we land on the DREAD island, there are 2 things that can happen.
One. If we have 2 unexhausted Heroic Sailors in our inventory, we must exhaust them both to defeat the DREAD.
Once defeated, that hex becomes an empty island and we will immediately get a LEGENDARY STAR. At the end of the game, we will get bonus points for defeating the Dread. Update the Legendary Star track and announce whether the end game has been triggered.
Two. If we don’t have 2 unexhausted Heroic Sailors, we will have to exhaust 1 Sailor or 1 Heroic Sailor. Do nothing if we also don’t have any Sailor at all.
That is all the actions we can do.
End of the Game and Scoring
As mentioned above, once a player gained their 3rd Legendary Star during Duties or Action phase, the end game is triggered. Players should finish the current round and play one more final round. After that players proceed to scoring the Gold.
Players gain Gold (Points) from 6 categories.
One. From visiting Islands with Gold. These are the islands that show a number on the hex or one of the connected hexes. Players tally the total score from all of the visited islands and write the total on the 1st Scoring space.
Two. From exploring the Unexplored Ocean Regions. Players earn 1/4/9/16/25/36/49 Golds for each different unexplored Ocean regions they have traveled to or through.
Three. From Cargos, sold and unsold. For each piece of sold Cargo, players gain Gold the same amount as stated by the number above that sold cargo.
As example, for selling all 3 of the same type, players gain 3+4+5 Golds of that type. Players also gain 1 Gold for each piece of unsold cargo.
Four. From Heroes or unexhausted Heroic Sailors. Players gain 2 Gold for every unexhausted Heroic Sailor. Nothing from the Regular Sailor.
Five. From Defeated DREAD. Players gain 14 Gold if they have defeated the Dread.
Six. From Legendary Stars. Players gain 3 Gold for each earned Legendary Star.
Solo Mode
When playing with solo variant, we still count the Score or Gold the same way as in multiplayer mode. However, to win the game we also need to gain at least 3 Legendary Star within 16 rounds as mandatory objective.
That is it with how to play Voyages.
My Experience & Thoughts on the Game
First of all, I have only played this game with solo variant, never with the multiple player one. Somebody said that without the time restriction, all players can just keep playing and probably hit all scoring conditions.
Well, it doesn’t really matter as long as they enjoy the game. But I do think I with that time pressure, I have to kind of push myself a bit to chase the better score.
At first, we probably don’t think about using any of the Sailor to change the dice. Especially if the dice are good enough so that each turn we land on an icon and get the resources. Exhausting the Sailor would be very minimal only when we think we just need small change or definitely get a bad roll. Maybe like get the same value in all 3 dice.
As we keep playing and trying to beat our own score within 16 rounds, we will realize that we cannot just chase everything. Then we will start trying to make sure that every round, we will get something or one step close toward something.
Considering that we have to stop the movement of ship on exactly the icon, there is an aspect of planning ahead. Even if it is just 2 steps to move the ship to that specific hex.
Well, I’m probably not a very good player but I don’t remember much planning ahead further than that happened. Maybe near the end of the game, I counted the remaining moves, probably like 3 or 4 rounds, then I start evaluating.
From my position, with the Sailors that I can get and use, and the next most scoring I can get. Especially if this involves selling cargos since that effort requires specific movement to get the cargo and the Settlement.
Even with that 3 or 4 steps ahead planning. it depends on whether we get a good roll, good enough not to use more Sailors that I have. So, the randomness kind of prevent the idea of longer term planning. We have to play more tactically.
It’s not that I don’t plan at all. At least with the Map #1, I always try to chase that Star on the Ocean and to defeat the DREAD. The reason is that beating the DREAD will not only give us 14 points which is good enough but it will also give us Legendary Star. A requirement for solo mode and worth 3 Stars.
To get 3 Stars to win, I can always get 1 from the Duties. More often than not, I will get a 2nd one from the Sailors even if it’s not always. So, for the 3rd one we can get either from the Star on the Ocean, Dread and Cargo.
Getting just the Star on Ocean is the easiest, but it doesn’t give additional points. For Dread, we need at least get 2 Relic, assuming we can keep 2 Sailors and then defeat the Dread.
Compared to Cargo, we need just 3 of the same type to get a Star and then visit a Settlements. From this we get 12 vs 14 for Dread. So, technically it is not that different. Also, it is not that hard to get 1 Cargo plus 2 of the Barrels plus a Settlement if explore the right half of the map.
While we can also get a Cargo from Duties, somehow, it is very rare for me to chase it. I would rather chase the Sailor or relic than investing in 1 type of Cargo and then cannot get anything later. Maybe the better way would be to get specific cargo first with Duties before we get the Barrel in the middle.
I don’t know why but, in my head, I tend to stick with the idea of that Star on Ocean and Dread more than the cargo. Maybe I should give it a try. I think if I focus on Cargo, I will have less flexibility for not getting enough Sailor.
With the way I play so far, I can get like between 1 up to 5 Cargos. If we stay in the right half of the map, there are 4 or 5 barrels which are enough to sell 2 or 3 full sets of Cargo That is worth like 24 to 36 points. I’m not really sure about getting 48 as the most though.
Back to the mandatory 3 stars in solo mode and we can only get 1 from selling 3 cargos, we have to rely on other means.
Somebody managed to get over 90 with this map which involved exploring all unexplored regions for 49 points Which is half of the score. I was even tempted to try that strategy in my most recent play.
I kind of failed and suddenly stopped after the 5th one. Honestly, it kind of ruin the experience. If anything, I got lower score than my regular way to play. Usually I have a lot of Sailors to use in any time. That recent play, though, there were moments when I didn’t have any and got very lucky roll. Or maybe I just forgot that I cheated and reroll until I got the good one.
Well, it kind of defeat the purpose of playing solo that I don’t need to compare or chase what other player can get. I should have realized that there is a random factor and just try to do my best with what I have. Trying to chase specific way to play ends up getting frustrated as the dice roll kind of prevents it.
Some people might disagree that the game has too much luck involved. Even I think that way at first but maybe now I don’t feel that it is entirely incorrect.
It got me thinking that maybe there is a best path to get the most score, assuming, of course, if we get the good roll. Considering that the Map or the scoring doesn’t change at all. Only the random input from the dice that will change from game to game.
Even then, my overall strategy doesn’t change. Sure, maybe with how the game progresses, I can realize that maybe I should switch between the Dread and the Cargo. Maybe I end up my movement on certain types of Cargo and build up that way.
On the other hand, I would also argue that the fact that my mind is stuck with the Dread, I probably dismiss the possibility to even chase a Cargo. This means the possible build up that can lead to different strategy will less likely to happen, if not entirely.
What I’m saying is that I hope that there is extra variable setup, Something like we roll a die and this will give 1 more resource to help that build up. Maybe like roll and get 1 to 4, one for each cargo type and 5, 6 will give us just more Sailors. Or something like roll a die and get 1 duties space filled that has to be the space beside the cargo.
Of course, this is just merely an idea. To make it work, it needs a good amount of testing and maybe adjustments like changing the number in Duties space.
I guess, as it is, there is a limit of what we can get from this Map #1 Game Sheet. But the best thing from this game is that the designer managed to have multiple maps with different experience but still using the same game system, roll 3 dice and make decision on how to use each.
I’ve played all of the first 5 Maps so far. While I don’t necessarily like every single one of them but they do offer very different experiences, despite using that same system.
The 2nd one where we will be hunting Marauders, gives us extra action at the end of each turn. Giving players more things to chase in an interesting way rather than stick with just a single Dread. Also, by completing rows of Duties opens to extra abilities not just a one-time bonus or a set collection for points.
The 3rd one feels very punishing to the point we can get even eliminated. Even by just rolling doubles or triples, players get punished for no reason. In this one, the Duties is not just something rewarding but becomes a challenge to survive from those penalties so we can play longer.
In the 4th one, they returned with less complexity compared to the 3rd. Duties is back to just getting reward. The goal to light the Beacon feels as good as chasing Marauders in the 2nd. With the replacement of the Settlement, Watchtowers feels disconnected. They are unique in the way we get bonus but there is no thematic ties like the previous map.
The biggest change with the 4th is they improved the Sailor system. It is no longer just collecting and exhausting them. But where we place each Sailor on the track will give access to certain extra action to the Sailor. Each of those abilities will give like extra action which could lead to more actions. While in the 2nd one, the extra action is just taking down Marauders for points and that’s it.
The 5th one seems to go back to the 3rd with more restrictive map. It is not as punishing as the 3rd but seems to be a better way to play in order to bypass those restrictions.
There is one new thing that they add and that is variable setup. They just place icons to gain abilities which will be the same from game to game. However, the which abilities we can get from one spot to another will change based on extra dice roll during setup.
Based on those 5, not every change is a build up from previous maps. They replaced some of the scoring, the set collection, the reward system from Duties.
It seems the designers are still trying something new with more Maps. Because of that, each map feels more like a standalone game than another expansion. Players don’t have to play earlier maps first before trying the new one and the complexity just keep increasing.
As long as the players already know how to play Map #1, they can jump to the other different maps. And it is nice that we can get all of that and any future contents / maps by paying just one time cost which is also very low.
The downside is that either players will have to play on their gadget screen or they have to print the sheet out. Not everybody has printer now. Even I am having a hard time finding printing service nowadays as almost every aspect of our life no longer need a printer.
For me, myself, I want to play tabletop games to get away from those devices. So, I have to print those sheets. Yes, the extra cost to print is still lower than just buying another manufactured physical game. No need to pay the cost of shipping games from manufacturer to multiple distributors, retailers before it reaches my place.
Also, we have the opportunity to control the quality of our printing, maybe do our own upgrade. Nowadays a lot of new games come with very high cost even if with a good production value. I personally don’t need that kind of production but sometimes I have no choice.
Well, that is a secondary aspect of this Voyages game. With the Print and Play and Pay just once for all contents, some people will like them but there will be some others that don’t care about it.
If the price of a game should represent the quality of the game itself, this one already has more value than probably most games in my collection. Overall, Voyages is a good game even just considering these first 5 maps.
As a print-and-play and a roll-and-write game, I do think there is a limit of what this game can achieve compared to bigger more professionally manufactured games. There is still some randomness with the dice and limited replay value from each map.
Then again, if the bigger, objectively better produced games are inaccessible due to cost and not everybody can enjoy, maybe this one is a better choice. For people who like this genre, there is no reason not to give this one a try.

Additional Contents / Expansions
Usually, when I write a review for other games, this section will discuss about expansions and accessories that we can add to the base game. With Voyages, there is technically no expansion but additional contents.
For those who purchased the game can just check the link to the Dropbox account and see if there is new content. Since the initial release of Voyages, the publisher has released several different Maps with twists on the rules from the base game.
Actually, the different maps can be considered more like Stand-alone games. Each of them is playable on their own. It’s just we need to understand the rule from the base game and then read the change or twists for the new Maps.
The only integration so far between different Maps is if we play with the recent Campaign mode. Even with that, we still play each session with just one map.
For the different maps, if we play with physical, printed Game Sheets, we still need to use 3 d6 and a writing utensils.
In addition to these official Contents for Voyages, there are also Community Maps, developed by some fans of the game using the same game system. We can find them by accessing the publisher Discord Channel.
If we like to play solo, there is a regular monthly solo challenge we can find on BGG page for this game. Anybody can participate. The challenge will use the same set of 3 dice roll result each round. Players then make decision based on that and compare the score at the end.
Map #2: Marauder’s Reef
If Map #1 is about collecting Cargo and try to sell them, in this 2nd Map, we will be hunting Marauder Ships to get Bounty Reward. The Ocean part of the playing area will show exactly 12 ships with 3 different types or size.
The more we hunt ships of the same types, we can get more Golds at the end. To hunt those ships, we first need to move our ship close enough to the target Marauder. For this Map only, each turn player will get one more action step, which is attacking the marauder step.
Each Marauder ship will have a number on their sail, either 2, 4 or 6 depending on the 3 different types. The number represents the base strength of the Marauder.
We need to have Sailor or Heroic Sailor to defeat them. Each Sailor is worth 1 and each Heroic Sailor is worth 2.
However, the distance between our ship and the Marauder increase the strength of the Marauder by 1 per 1 space away. As an example, if the Marauder has a base strength of 2 and they are 2 spaces away, we need a total power of 4. This can be having 2 Heroic or having 4 Sailors, or 1 Heroic + 3 Sailors.
Defeating a Marauder doesn’t exhaust any of those Sailors. While those Marauders don’t move, we will probably still spend those Sailors just to get closer to the next marauders.
Like completing one type of Cargo from Map 1, completely hunting down 1 type of Marauder can give us 1 Legendary Star.
Another change related to this is the FORTS which is similar to Settlements. When we visit any of the Forts, we get to choose which type of the Marauders will give double the points. There are exactly 3 Settlements and we can visit them to double the points before or after the hunt. We will also get 1 Sailor for visitng the Fort.
Another challenge from this Map is the REEF. The Map will have a region or hex of Reef that works like a Wall. The ship cannot travel through it unless the player has unlocked the ability to do so.
It’s like a combination of Border and an Island. We cannot get through but they have a shape like islands.
Sailor, Relic and Heroic Sailor still works the same as in Map #1. But they also change the DUTIES. Similar to Map #1, we are still trying to fill up to 6 rows and 4 columns to gain some rewards.
Two columns will give 1 Sailor each while the other 2, 1 Relic each. For each row, we can unlock an ability once we’ve filled the 3rd space of the row. The abilities are permanent after activation.
This ability can be about change +/- 1 for Movement or Speed or Duties, +2 Power to fight Marauders, Move through Reefs, or Immediately gain a Heroic for every new Sailor.
Completely filled any of 3 rows will give us 1 Legendary Star. The scoring will be similar except the Cargo is replaced by Marauders and for each completed Duty Rows. We still gain points from Star, unexplored regions, unexhausted Heroic Sailor and Island with Golds.
From the first 5 Maps, Marauder’s Reef is the most favorite according to the community Poll on BGG page for Voyages.

Map #3: Cold Dark Depths
In this one, we are sailing to cold part of the Ocean with full of ice where we can find hidden Legendary Creatures. The map is divided into 4 sections. One is the Starting region which has no creature while the other 3 has one specific Creature each.
Each region then will show a couple of hexes with icon of that Creature, which represent the sighting spot. If we stop the ship movement exactly on that position, we can fill in the journal, one for each creature and another one for one each. Each journal for one creature can be filled up to 4 times and we will get 12 points for completing that journal. Except one for each of 3 is only worth 8.
However, if we move the ship through where the creature is on, it will damage the ship. Each creature will only damage the same part of the ship. Every part of the ship has a limit of how many times they can take a damage up to 4 or has like 4 health bars.
The moment any part has less than 4 health bars, then the part becomes not fully functional. In that case, players will then suffer a penalty, losing the ability for doing something in the game. It can be not being able to use Sailors at all or take a Sailor from the sea.
However, players can try to repair and increase the durability of that part by using filling Duties dice for that part. This will increase the health bar so it will go to 4 again. Of course, if it takes another damage then it will lose the function again.
It is possible that one part becomes completely irreparable since there is a limit of repair we can do to each part. In the solo mode, we immediately lose the game if we let it happen even to just one part. So, there is an early player elimination.
As mentioned before, the Ocean we are traveling through is filled with a lot of ice. Everytime we move the ship through those hexes with ice, it will also damage the ship.
Those two things are not the only things that will damage the ship. If we also get double or triple from the initial roll, the ship will also suffer a damage. This variant is very punishing compared to the other maps.
In this map, instead of Settlements, there are SHIPYARDS. By visiting a Shipyard, we will upgrade one of the Ship part of our choice. This part will become immune to all of those damages.
Besides the scoring of set collection from the Journal, we can still get points from Island with Golds, Unexplored Ocean Regions, Unexhausted Heroic Sailors and Legendary Stars.
The Sailor system remains the same. While how we fill the duty is a bit different, we are still trying to complete rows or columns for reward.

Map #4: Lighting Beacon Bay
In this one, we are going to light beacons of Beacon Bay. There are 8 hexes with this beacon, spread around the map that we can try to light them up. The more beacon we can light up, the more valuable each of them becomes.
To light the Beacon, we can simply just land the ship on that island. However, we can also light it without landing on the island. What we need to do is to move the ship between the beacon we are trying to light up and the beacon that has been lit up previously in a Straight line. Straight line here means following the direction based on the 6 cardinal movement directions.
It’s like they are firing a fire arrow from the ship to that beacon, as presented by the icon of the Sail for this map. Lighting a Beacon is an extra action at the end of each turn.
Instead of Settlements, this one has WATCHTOWERS. Everytime we visit one of this Watchtower, we fill the Watchtower track starting from the top row of 4 rows.
Each row will show 4 possible rewards we can choose from a Legendary Star, Sailors, Filling Duties Space or Golds. As it goes to the lower row, the reward of each will offer better version of that reward, except for Legendary Star.
The thing is, once chosen, we cannot take the same type of reward from the subsequent rows. We might one to save one type of reward to get a better value of that later but there is a chance we may fail to get another Watchtower.
This actually doesn’t really help the Beacon theme but it offers more interesting choices.
As for Duties, we are still trying to fill rows to get a reward but no more filling a column. There are 6 Duties rows with between 3 to 6 spaces that we need to fill before we get the corresponding reward. Each row can only be filled by 1 and the same number and each number can only be used in one row.
I think the biggest change from the base system is the Sailor. While we still get the Sailor and Relic to upgrade them to Heroic, but where we place the earned Sailor can activate different ability when we spend that exact Sailor later.
There are 3 rows for this Sailor track and each row will have its own ability. 1st one can increase the Speed by 3 with Sailor or 6 with Heroics.
2nd one can give bonus movement to any direction after the initial movement. We get 1 space movement with Sailor or 2 with heroics.
3rd one allows us to fill the any of the duty space by 1 using Sailor and 2 using Heroics. While those Sailors can be useful for those extra actions but we can still earn Gold at the end for unexhausted Heroic Sailors.
Like the previous map, we will still gain Gold from Islands with Gold, Unexplored regions, filled Duties row, and Legendary Star. In addition to the new scoring from Beacon and Watchtower.

Map #5: Race at Coal Rock
This is another challenging Map. The Reef from Map #2 is back but with more complicated placement. We actually need to move the ship in hexes among these reefs and until we gain the ability to bypass those reefs.
Some of those narrow reefs form natural arches, the CORAL GATES, denoted by a bold line on the Map, between 2 hexes with reefs. The goal in this map is to cross as many Coral Gates as we can.
Everytime we cross a new one, we gain access to higher Golds but not immediately earn them. We can either choose to take any amount of Gold based on the current number of passed Gates or we can keep trying to cross more so the Gold reward is higher.
If we choose to claim the Gold right away, we cannot get more if we then cross another gate. On the other hand, if we push our luck too much, we may bust, and fail to claim the next reward. Claiming the reward can only happen when we cross another gate.
Besides trying to cross Gates, there are SHIPWRECKS. If we manage to stop the ship movement in any of these, we gain one of 6 permanent abilities according to the assigned number to that Shipwreck.
One of them allows us to move through Reefs. Another allows us to take Sailor or Relics just by moving through the icons or immediately gain a Heroic. There is also ability to change the movement direction after the initial, increase the speed or fill more duty spaces.
What’s interesting with this one is it has variable setup for the ability position among the Shipwrecks. The position of the Shipwreck on the map stays the same. However, in one game, that same Shipwreck can give a different ability from a different session.
While this Map #5 is not as punishing as Map #3 but it feels like getting free pass ability through the reefs is a must. Otherwise, constantly trying to move through the reef might easily deplete the Sailors.
The Sailor system is back with the original one, not following the 4th Map. I think the biggest change is how we use the Duties Die.
The Duties section now offers two options that we can only choose one each turn using the same die we pick for Duties. One is DIVING which is just filling rows and/or columns to gain reward similar to previous map but there is a twist.
The Diving section has 6 rows, one for each value, 1 to 6 top down. However, we can still fill the upper rows with the value higher than the stated by the row. So, die with a value of 6 can only be used for the bottom row while the top one can be for any row. In a way, it’s like diving and the value is like the amount of air we use to dive.
Two is DRIFTING, which allows us to move the Ship again up to 2 spaces following the same cardinal directions based on that die value. This can help moving through those Reefs, at least before getting that one ability.
We cannot choose the Drifting if the initial movement of the round ends on an island. But we can still choose to dive in that case.
Lastly, in this one, instead of Settlements, we can find IDOLS on several islands. If we land on one of those islands, we just get to fill 2 spaces of the Diving section as if we gain a die with a value of 6 twice.
Besides getting Golds or score from Coral Gates and Shipwrecks, we still gain the same scoring category like in previous map. From Unexhausted Heroic, Gold Islands, Unexplored Ocean Regions and Legendary Stars.

Campaign Mode
With the campaign mode, we will be playing 5 consecutive games of Voyages, each with different map in any order that we want. A Most Epic Voyage.
At the end of each Voyages, we can spend the Legendary Stars we just earned to either Upgrade the Ship or Upgrade the Crew’s Skills. Both will give permanent benefits for subsequent sessions. However, the Crew’s skills can only be used once per game, and we have to exhaust a Sailor to use it.
The cost to upgrade is between 2 to 3 Stars. We have to immediately spend the Stars after each session or we will lose it.
There will be a random different QUEST that will be added to each session. If we can complete that Quest’s requirement, we will get even more Legendary Stars.
Lastly, there will be a NEMESIS that we will be facing against after the 1st game session. The Campaign sheet has 3 and we will face against one for the entire Campaign.
The Nemesis will add 1 extra restriction each session from the 2nd one onwards. For example, we can only move 1 space less each turn or we cannot use the Sailor to change the Speed. So, by the time we play the 5th session, there will be 4 restrictions we need to deal with.
The Campaign sheet will help us keep track of the upgrades and used skills. We will count all of the Golds and Stars from each round to determine the score.
If we play in Solo mode, there will be 2 difficulty settings. In Normal mode, if we lose the game, we just replay the session but we will lose 10 Gold. For the Hard mode, if we lose, we have to restart the Campaign.

Session Reports and More Pictures
Usually, I share a session report of playing a game on BGG. Here are the links of each session for this game.
I also put turn-by-turn pictures of a session and unboxing pictures for every game on my collection that anybody can find on my Instagram. For this game, search for #VoyagesAtHomeOfMark on IG for all of the sessions.
Also, check out my blog on BGG. I occasionally write a detailed session report / written playthrough for a game that I’ve played. In each, I will explain the decision process during the game every turn.
January 2026 session and more pictures of that session on Instagram, Tumblr and TikTok. This one was with map #2. Scored 61, didn’t land on any island with just Gold, failed to get the last legendary star from the marauders. Playing time was about 28 minutes.
:strip_icc()/pic9354836.jpg)
September 2025 session and more pictures of this session on Instagram and on TikTok. Another solo session and back with map #1. Scored 60 but I think I mixed up between doing duty first to get sailor before using the other 2 for movements. Playing time was about 32 minutes.
It seems my post on Instagram not only got “like” from publisher but also became part of someone’s stories. That went viral compared to the regular post.
February 2025 session and more pictures of this session on Instagram and on TikTok. This was solo session with map #5, scored 96.
July 2024 session and more pictures of this session on Instagram and on TikTok. Solo with Map #4, scored 94.
May 2024 session. Map #1, teaching session to a casual gamer, solo game.
March 2024 session and more pictures of that session on IG. Map #3, scored 48.
January 2024 session and more pictures of that session on IG. (Map #2).
July 2023 Session Report and Pictures on IG. (Map #1)
February 2023 Session Report and more pictures on IG (Map #5).
December 2022 Session Report and more pictures on IG (Map #4).
November 2022 Session Report and more pictures on IG (Map #3).
October 2022 Session Report and more pictures on IG (Map #1 and Map #2).
:strip_icc()/pic9173991.jpg)
/pic8695154.jpg)
Summary
Voyages is one of the Print-and-Play, Roll-and-Write games where we can pay one time very low cost to have access for all contents including any official future ones. Currently the game already has 5 different Maps or Game Sheets with a very different experience each plus a campaign mode to play them all with progression from game to game.
This is mostly multiplayer solitaire. Any number of players can play together as long as each player has their own sheet.
As the name suggests, it’s about a voyage, where we will move ships on the map to explore different part of the Ocean. Along the way, we can get Sailors that can help us change the direction of the ship or the ship’s speed, or completing some duties for rewards.
Each round, we will roll 3 d6 and the result is the same for all players. We will use one to determine the direction where the number represent each side of a hex. Then we will use the 2nd die to determine the Speed, which is how many space in that direction the ship will move. So, there is a spatial puzzle element to it.
The last die can be used for Duties. This is like completing rows and columns in most roll and write games.
So, basically, this is like a roll-and-move game like what we can find in a game of Monopoly. The difference is that we have 3 dice to choose for where to move. Since it still uses dice, there is some random or luck element to it.
However, we can exhaust available Sailors to mitigate that. For each exhausted Sailor, we can change the value of 1 die by +1 or -1. With this system we really have a lot of combinations to use those 3 dice.
Obviously, we have to carefully manage these Sailors as resources. We don’t want to just exhaust them recklessly so that at the time we actually get bad roll, we don’t have them to change. It is possible that all 3 dice will show the same initial value.
We can get more of these Sailors by stopping the Ship movement exactly on an Ocean hex that shows a Sailor icon. There is also a way to upgrade the Sailor to a Heroic by getting a Relic icon.
The Heroic allows us to change 1 die to any value by exhausting just one. But if we don’t spend these Heroes, we may get more points at the end.
Since we have to aim for specific movement, sometimes the game encourages players to plan ahead, maybe one or 2 steps. if one move is not enough to reach that destination, then we have to plan that extra move.
Planning further than that seems impossible or unnecessary mostly because of the dice roll. So, for the most part, this is a tactical game but we can still have a main overall strategy from start to finish. By having that long term in mind, we may push ourselves to exhaust the Sailor more so that we can be more efficient in each round.
Of course. we can just make the best decision with what we have each turn. Actually fixating too much to that grand strategy may actually ruin the experience if the dice roll kind of prevents it.
That is the basic system of the game that works to all different Maps the publisher has released so far. Besides that, each map has each own Duties system and main Set Collection aspect.
For example, Map #1 is about collecting several types of Cargo and tries to sell them on Settlements. The Ocean may show one of the Cargo icons and similar to getting Sailor, we have to stop the Ship movement exactly on the Cargo icons.
After having 1 or more cargos, we have to move a ship and land on an Island that shows a Settlement icon. We can choose to sell one of all types or all of 1 types of cargos with these Settlements.
By selling the cargo, each sold cargo is worth more points than just collecting them at the end. That’s just one main way to score points.
Another way to score is by defeating the DREAD. We first have to land the ship on the island hex that shows this Dread icon. Then we have to exhaust 2 Heroic Sailors.
Another big scoring opportunity is by exploring unexplored Ocean regions, 6 regions on the edge of the board, plus 1 in the middle. The more different regions we explored, the more valuable each region becomes. So, it is a bit of push your luck aspect as we may not have the chance to explore all 7 but we will try.
The end game is triggered once one of the player has gained 3 Legendary Stars. Players will then finish the current round and play one final round before calculating their score. Whoever scores the most wins.
In the solo mode, we have to get 3 Legendary Stars within 16 rounds. That timer element seems to be a better way to play. With the multiplayer mode, players can just keep collecting points without even triggering the end game.
Using the solo variant, the game takes about 30 minutes. Since there is no interaction between players, other than triggering the end of the game first, what one player does will not affect their opponents. It’s possible that each player just play the solo variant and then they compare score.
That’s just Map #1. With the other maps, we may experience a rewarding game or a very punishing one. Some can give extra actions or penalties with a very unique theme for each, tied with how we can score the most in that specific map.
Each map itself doesn’t change from game to game, at least for the earlier maps. The position of each icon, including starting position stay the same so it may seem that there is a very optimal path to gain the best score. 3 dice roll at the start of each round is the only random variable from game to game.
Players should just try the different map, rather than expecting different results from the same Game Sheet 1. Well, if we already paid for it, we just need a little bit extra effort to print the next sheet or just play digitally.
For players who love Roll-and-Write game that don’t have a problem with printing their own component, I don’t see any reason not to try playing Voyages.

More Similar Games
There are many tabletop games out there whether a board or card game that might share some similarities with Voyages. Some people may look for those similarities that they enjoy. It can be the mechanism or even just the same theme or setting.
Usually, a board game will have a lot of elements. It is kind of difficult find another game where everything is similar. Which is why, in this section, I try to break them into things that I enjoy from the game and point out games that share the same experience.
These next games are just some games that I have tried, played and written a review for them, up to this point. Check out the link to each article to find out more and also check this Complete list for more games.
Also, check out my blog on BGG. There are more games that I’ve played but I haven’t had the chance to write a review for each.
Roll-and-Write Games
This is probably one of the most popular genre in tabletop game industry. It is very easy to produce, quick to setup and offers a good gameplay experience. Even more popular board games eventually get a spin off in this format.
Some people don’t like it but some others, like me, love this. I just wish I don’t need to print them out myself. Most of them are solitaire game but some offer a good amount of player interaction.
On BGG, we can also find more games with this format here. We can even find a free one that we can just print and play. The designer / publisher of Voyages already has 2 more titles, Aquamarine and Waypoints. Maybe there will be more in the future.
I’ve only played some of them. Here are just a few that I have written a review for. These games only share similar format but the gameplay can be very different.
Biblios: Quill and Parchment. This one has a bidding aspect. Players will be accumulating bidding power which they can spend in the second half of the game to bid for a set of dice. This one also has a mini game with the point-to point movement on a small map.
The Castles of Burgundy: The Dice Game. This one is a territory building. Each turn, players will roll 2 dice for color and 2 dice for value. They have to pick a combination of 1 value and 1 color to expand their territory with the matching type.
Similar to Voyages, there is a way to manipulate the dice for both the color and the value. We can also accumulate that mitigation for later rounds when we get bad rolls.
Kingdomino Duel. This one is a dice drafting game for 2-player. Each turn, one player will roll 4 dice. That first player will then take 1, the opponent takes 2 and the last die for the 1st player again. So, each player will get 2 dice and they will use both to draw a domino tile on their board.
The goal for this is also to expand the territory following the same rule as domino game where we can only place the same terrain type next to the existing one. However, we have to be aware that the dice we didn’t pick might give a great benefit to the other player.
Riverside. Maybe this one has the closer ties in theme with Voyages since this is about cruise. A tourism in cruise, along the Riverside. In this one, the cruise will keep moving from start to end. We can deploy some boats with passengers on board to visit various nearby villages for different types of excursions.
The challenge is that we have limited reach unless we are willing to spend more resources. So, there is a timing element. We know that the cruise will get closer to any of those villages. However, we might have a tough choice in choosing between chasing one village over the other.
Similar to Voyages, since we know the position of everything from the start, the game becomes more strategic. We may have an overall plan while trying to be tactical with the random dice roll.
Other Dice (Manipulation) Games
While the previous section talks about Roll-and-Write with dice, but I mostly discussed about the format. There are other dice games outside this genre with more dice manipulation like Voyages with the Sailor.
Here are more games that use dice but not a roll-and-write.
Aerion. In this one we will roll 6 dice and try to make a poker set like straight, 3-of-a-kind, pair, flush, to draw a card from the corresponding deck. We can discard a face up card from any of 6 deck to reroll all or some of them like Yahtzee.
There is one ability that allows us to flip the dice which will significantly give us control over those dice result to make the set. Depending on the setting, we may immediately start with that ability or we have to find a way to gain that ability.
Actually, from the same series as Aerion, Nautilion has more similarities to Voyages. We will be rolling 3 dice each round and have to assign them all. One for us, and the other two for the opponent.
Another similar game with roll 3 dice and assign them all each turn is Dragon Dungeon: A Roll and Write Adventure. This is also PnP but we can play them for free.
Coimbra. This is a worker placement game that uses dice as a worker. Players will take turns drafting from the same pool of dice with 5 different colors. The value will determine the bidding power and cost to recruit character while the color will generate different resources. There is a very limited way to still change the value after the drafting.
Micro City. This is another city building game where we will move worker over various space in a tiny city to gain required resources to build buildings. The main mechanism is actually hand management of 6 cards that we can only play once each until we retrieve them all back.
However, every turn, we will also roll 2 dice. We can use these to enhance the action from the card and/or the action on that worker spot for better results. The challenge is that each card and worker spot require specific die value for the better action.
Obviously, the dice might give random result. We can spend the precious resources that we can use to build, but instead to change the value. Or we just consider the dice as a bonus and ignore them if we cannot use them.
One Deck Dungeon: Forest of Shadows. This one is a fantasy dungeon crawler game that uses a lot of dice. The dice are the strength of the characters with 3 different colors that represent either Attack, Speed or Magic dice.
Each round, player will face an encounter that has challenge boxes where we can put some dice. The box will have requirements like specific color or specific value. Some of those boxes will have consequences if we fail to cover them using the right dice.
As the game progresses, players can level up their character to gain more dice per round or skills to change those dice. We will be changing the value or trade them into different colors.
Tumble Town. This is another city building game where we will use the dice to construct buildings by stacking them. Every round, we will draw 1 building plan and a set of 3 dice.
To construct the building, the building will have requirements like the color / material or the range of value. We need at least have the same amount of dice but there is a room to use not the dice with the right color or value. There will be consequences of course.
After that, we can place the constructed buildings on the player board. The player board itself will have further requirements like the certain floor must have specific color of buildings. If we can meet the requirements, we will gain more points.
In this one, we will find many ways to manipulate the dice from trading, flipping, increase / decrease value, change to wild and many more but we need to construct those buildings first.
Even if we cannot use the dice yet since there is a limit of times per round to use the ability to change them, we can carry them over to the next round. However, there is a limit. Alternatively, we can just take another card that might share the same requirements.
Final Words
That is all I can share with you about Voyages, a Print-and-Play Roll-and-Write Game. This is probably the first one that introduced the idea of pay once and get all future contents in very affordable price.
I may have missed something that I should have discussed regarding the game. Please don’t hesitate to point that out and share what you know related to this game and I will update this article.
I keep saying that these tabletop games can be a good way to spend some time without looking at the screen of our gadget. If we do have someone close, that we can play with, there are other games where we can play cooperatively or competitively but with a lot of player interaction.
The game can be very fast or like a filler type or it can take hours to play. Some games can also be played in solitaire mode and they are still more engaging than other entertainment activity. Some may say, it’s like a workout for the gray matter of our brain.
So, what is your experience on playing this game? If you know other games similar or even better than this, please do share via the comment section below. I would love to learn and play that game, assuming I can get a copy.
This article is just my notes about what I can find from the internet. Hopefully this can help anybody who reads it.
Thanks for reading.
Mark M.