In tabletop game industry, some gamers only look for a good gameplay, regardless of the theme or art. Some others might disagree and this eventually pushed some publishers to develop their game better. Good gameplay with also good presentation to draw more people into playing it.
There was an example when a gameplay is considered great, maybe even the best for some people but somehow had horrible art, theme and settings. Santa Maria was one of the popular example. It was about colonization. Even though the designers explained that they were trying to make it like a satire, it kind of hurts the reception.
So, now, the designers tried to fix it by releasing a new game called Saltfjord. It is not just a change for the theme or settings but there is some additional change to the gameplay.
Saltfjord is about building a fishing village but with the similar dice drafting, dice worker placement and tile placement mechanism from Santa Maria. I personally have never played that previous title so I don’t know the change and how different both games are. Some might say that they still prefer the gameplay in Santa Maria.
Title: Saltfjord
Year Released: 2024
Designer: Kristian Amundsen Østby and Eilif Svensson
Publisher: Aporta Games
Artist: Peter Bartels and Yan Moussu
Genre: Norway, Nautical, Farming, City Building, Dice Drafting, Dice Worker Placement, Tile Placement, Polyomino, Competitive, Official Solo Mode, 1-4 players
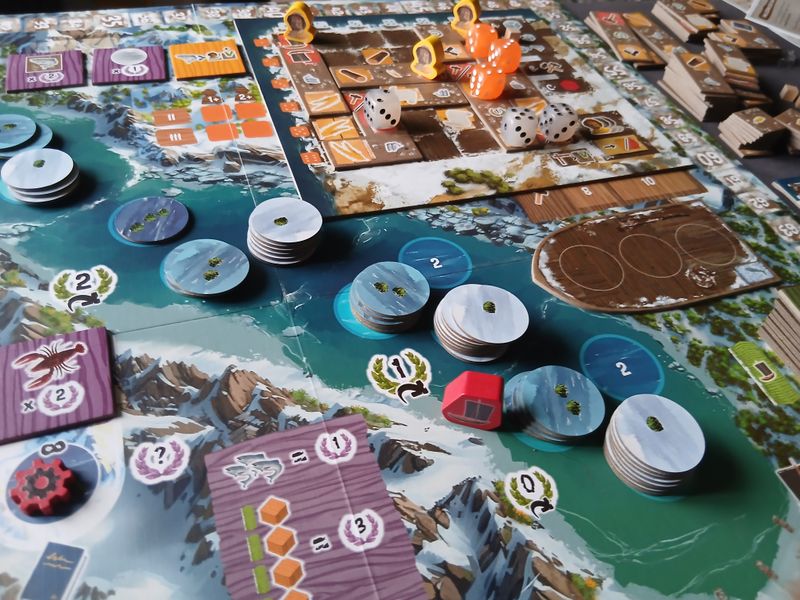
Overview
In Saltfjord, players are competing to build the best fishing village in northern Norway. The game lasts for 3 rounds in which every player can keep taking turns doing actions until they choose to pass or retire.
On their turn, players can choose to gain worker dice to activate existing buildings on your village. Or they can choose to make a major upgrade to your village. Major upgrade means adding more buildings to your village, ideally so the worker dice can activate more actions.
In order to do a major upgrade, you need a wood and a plank. You get them and other resources mostly from activating buildings from your village using the dice workers. Every round you can take up to 3 white dice plus a number of orange dice equal to the current round number. So, in the 3rd or final round, you can get up to 3 white dice and 3 orange dice as your workers.
The White dice activates any buildings in the entire column of your village from top to bottom. While the Orange dice activates the row from left to right. Ideally, you want to activate a complete row or column by having major or minor upgrades to you village.
It is possible to keep activating the same row or column using dice with the same value. However, after you activate either of them, you move that die to the last action space of that row or column. This means, the last action on either of them might not be available for activation again until the next round.
The dice are rolled at the start of the round. Then every player take turns drafting them from the same pool. So, if you have specific column or row you want to activate and there is only one dice to do so, you might want to take them first before the other players.
Alternatively, you can also change the value of the dice by spending 1 Fish. Each spent fish increases or decreases the value by 1. The value doesn’t wrap around so if you want to get a 6 from a 1 you have to spend 5 fishes which is a waste.
There are a couple of different actions you can activate on your village using dice. Some of them can generate resource, either Wood, Paper, Fish or Wheat. Some of the building upgrades can even give you plank, book or flour. They are like the better versions of those resources.
You can also choose to upgrade the resource to a better version by spending 2 fishes. Wood becomes Plank, Wheat becomes Flour and Paper becomes Book. A fish itself can be upgraded into either wood, wheat or paper. Then you can keep upgrading the Plank, Flour and Book to become a Gold.
You can also downgrade them in that same direction. Or you can choose to sell them for fishes. Selling wood, paper and wheat is worth 1 fish while their upgraded version is worth 2. Gold is worth 3 fishes. All of these conversions are considered as Free Actions you can do on your turn. One of the action spaces on your village can also upgrade a resource if you activate it.
Other than gaining resources, the actions you can activate on your village can also do other things. You can complete an order with the crate symbol or gain technology with the gear symbol. The hammer icon means to build a small or minor upgrade to your village. The boat icon means you go sail to fish.
For completing an order, you can choose any of the 4 face-up order tiles. These tiles show you the resources that they want and the VP value. After you complete them, you take the tile and place it on the matching row of your player boards. At the end of the round, when you choose to Retire, you will gain bonuses based on which row of orders you have completed.
For gaining technology, you can choose which technology column you want to upgrade. You can upgrade each tech track or column 3 times. Each upgrade requires different types of resources. Also, if you reach the top of any track, you activate the end of the game scoring of that track.
For craftsmanship track, you can gain gold and single space workers. These single space workers can be used once every round. They work similar to dice but only activating one space from your village.
For Carpentry track, you can upgrade your boat so when you go fishing, you can take more fish home. The 2nd upgrade of that tech lets you gain one of the unique abilities. While the last upgrade of the track lower the cost of building upgrade by one wood. So, for minor building, you can get it for free.
For Logistic track, you get a set of resources for the first upgrade. The 2nd upgrade lets you change the bonus for completing the order while the last upgrade lets you gain immediate bonus for completing an order.
For Fishing track, the first upgrade lets you take 2 fish tokens while fishing. The other 2 upgrades let you fish from deeper level of the sea.
As for building upgrade itself, major or minor, you are basically placing the polyomino tile to your village. The major one lets you take one of the size 3 with 2 different shapes, L or Straight shape. While the minor one is either size one or two. Spent the resource and take the corresponding tile from the top of the matching stack.
You can only fill the empty spaces on your village board. Any of these building upgrades usually have a space showing a one-time bonus. They are not action spaces you can trigger with dice or single space worker. You gain them by completing the row or column. If that space is in the completed row or column, you take the resources.
As for the Fishing or Boat action, each boat symbol you activate lets you do one of 2 things. Either advance your boat towards the sea by one space or return home. When you advance your boat to the next sea space, you take one or two fish tokens depending on your technology.
You then place the fish token to your boat. Your boat has capacity and you only gain the fish resources when you choose to return home. You can go as far as 5 spaces from the port. The farther you go, you gain higher VP when you return home.
When you can no longer do anything on your turn, you can choose to end the round by doing Retire action. With this action, you can choose one of the 5 different retire actions still available. The other players that retired before you might take those actions first and you have to choose something else. Also, the action you choose for this determines the starting player for the next round.
In addition to that, when you retire, you also get to activate your piers, assuming you have completed some orders. Different pier activates different action per completed crate of orders that you have.
If you choose to retire early, then the other players can keep going until all of them choose to retire. Then you prepare for the next round and each subsequent round will get you more dice. After 3 rounds, the game ends and whoever scores the most points wins.
That is the general idea of how you play Saltfjord. The game also comes with advanced mode where introduces a new element: Wagons. There is a solo mode without opponent but you need to reach minimum total score and minimum score of your starting scoring tiles.
Session Reports
September 2026 session and more pictures of that session on Instagram and Tumblr
I got 2 solo sessions and I definitely didn’t win. For the 2nd play I thought I scored 116 and got the Bronze Medal. Only afterI read the rules again while writing this, I realized that the score from the 2 starting scoring tiles doesn’t count towards your final score. You need to score at least 10 from each but they don’t count. This means you need to stop working on it at some point.
So, I thought I got 28 from those 2 my real score was only 88. No medal but I still won, according to the scoring chart. Definitely there are rooms for improvement.
From that 2nd play I only reached the top of 3 technology tracks. Even though I did focus on fishing, I didn’t upgrade the 2nd column at all. My village board itself still has 8 empty spaces with only 3 completed columns and 2 rows.
Another error that I did in this play was that I was supposed to remove the top of order tiles each round. So, if I failed to complete any of the starting order tiles, they will get removed. That means, I probably scored even lower as those were on easier side to afford. In the end I only completed 1 order per pier plus one for the 3rd.
The decision in this game is really a tough one for me. Early in the game you have to choose between upgrading your village or buildings versus upgrading your tech. If you choose tech, which track do you want to upgrade?
I basically ignored completing orders in the first round considering that the resources might be useful for something else. At least you can always turn any of them into fishes. Fish gives a lot of flexibility.
For me, the challenging part is that using the dice to activate a row or column gives you uncertain number of actions. At least, if you involve adding more buildings in between activating different dice.
That is also assuming you have the dice with the right value. When you have to change them, you might end up spending some resources to gain a fish to manipulate the dice. This is also just me with solo play. In multiplayer game, you probably have to consider that the dice you like might be taken by other players.
Also, while your board has every type of actions, sometimes, the rolled dice shows the column with only 1 action space. That is very brutal if you only activate once.
While the action is there, sometimes you have to choose like order or minor building. Maybe that space is still available after one dice but it doesn’t mean there is enough or correct dice to activate again.
So, in the first round, you will feel like you are not doing enough. In subsequent rounds, with more buildings and of course, more dice, you will do more. About 15 minutes for first round, 18 for 2nd and the third one was almost 30 minutes for me playing this solo.
The tile placement is of course, fun for me. Figuring out which row or column is the best to complete and how do you lay out that tile. But then, maybe, right in the next round, the rolled dice will force you to activate other rows or columns. Not to mention the top of those upgrade buildings may not actually show an icon that actually helped you with your goal.
At least, that resource management means every single resource type is connected to each other. You may not get them directly from the buildings but you can always find a way to upgrade from other things, in expensive way.
Also, somehow, I kept forgetting that I had the single space worker in the first round. Not sure how far that can help if I actually included them in my plan during the game though.
So, as my initial impression. I enjoy my play so far. It was tough but maybe with more play I can finally get the idea of how to do well with that dice activation and tile placement.
More unboxing pictures of Saltfjord on my Instagram.